我试了一下圆形的1.5寸的,和那个方形的有所不同,固件肯定更新过了,用原始的hack是找不到匹配的。
其实需要自己去把下载来的固件打开,重新编辑的。
具体看:
So you've got an unsupported ST2205U-device and want to create support for it?
I hope you understand 65C02 assembly, or at least are willing to learn a little
of it. Disclaimer: if you end up with a bricked device, I'm not responsible!
This is what's needed:
- Dump the firmware.
./phack -df fwimage.bin /dev/sda
- Break up the firmware in segments. Each segment is 16K:
for x in `seq 0 3`; do dd if=fwimage.bin of=fwimage-seg$x.bin bs=16384 skip=$x count=1; done
- Disassemble segment 1 using a 68c02 disassembler. You can use the symbols.def
file in this directory. Segment should be loaded at address 0x4000.
- Open up the disassembly file and look for a shitload of consecutive writes to
the addresses 0x8000 and 0xc000. If these are there, the firmware uses an
external LCD-controller. If you can't find these writes anywhere (not even
in the other 3 segments), it uses the internal one and you'll have to figure
out the code to modify my assembly yourself.
- Copy hack/m_coby_dp151 to hack/m_[the name of your device]. For the patch to
work, you'll need to create a correct spec-file. Use the existing one as
a template.
- Disassemble segment 0 using a 68c02 disassembler. You can use the symbols.def
file in this directory. Segment should be loaded at address 0x4000.
- Open the disassembly file and look for something like this:
LDA D037c
CMP #$31
BNE L73c1
LDA D037d
CMP #$00
BNE L73c1
BRA L73d3
The important thing here is that two subsequent memory locations (here
037C:037D) get compared to 0x3100, and later (not shown) to 0x3300.
Modify the CMP_VAR1 and CMP_VAR2 in the specs-file to reflect these
memory locations.
- A few lines later, you should see something like this:
LDA #$ff
LDX #$ff
STA D037c
STX D037d
RTS
The location of the LDA-instruction, minus 0x4000, should go into the
specs-file as PATCH_AT.
- Locate some free space. We require a location in the first segment that has
about 240 consecutive FFs in it. Load up fwimage-seg0.bin in your favourite
hexeditor and go look for a location like that. Hint: there's usually one
at the end of the file. This should go into the specs-file as EMPTY_AT.
If the space is very small (<500 bytes), please make a note of it in the
spec-file.
- Locate a routine starting with
PHA
LDA #$55 ; 85 U
STA D0240
LDA #$53 ; 83 S
STA D0241
LDA #$42 ; 66 B
STA D0242
LDA #$53 ; 83 S
Make a note of the location of the start of the routine and enter this in the
specs-file, minus 0x4000, as SEND_CSW.
- Locate a piece of code looking like this. (The refs to adresses 2xx will be
the same, the ones to 37x may differ):
STZ D0370
STZ D0371
LDA D0216
STZ D0370
LDA D0217
STA D036f
ASL D036f
ROL D0370
ROL D0371
- Fill LEN1 to LEN3 with the ASL/ROLled adresses, fill LEN0 with LEN1-1. In this
example, LEN0=$36E, LEN1=$36F, LEN2=$370, LEN3=$371
- Check the kind of controller you have: if you find this in your disassembly
code (mostly in segment 1), your controller most likely is an PCF8833 and you
should leave your CTRTYPE at 0:
LDA #$2a ; 42 *
STA X8000
(Snip! 2 or 4 stores to C000)
LDA #$2b ; 43 +
STA X8000
(Snip! 2 or 4 stores to C000)
On the other hand, if your code looks more like this:
LDA #$f4 ; 244 .
STA X8000
(Snip! one aditional store to 8000)
LDA #$f6 ; 244 .
STA X8000
(Snip! one aditional store to 8000)
LDA #$f5 ; 244 .
STA X8000
(Snip! one aditional store to 8000)
LDA #$f7 ; 244 .
STA X8000
(Snip! one aditional store to 8000)
you've got a UC1697V on your hands and CTRTYPE should be 1.
- Fill out CONF_XRES, CONF_YRES with the horizontal and vertical resolution of
your device.
Leave CONF_PROTO at 0, which is the PCF8833-protocol.
- Regenerate the binaries using the 'assembleme'-script. You'll need to have
crasm installed for this.
- Try the hackfw script. If the script finds your device profile and asks if
you really want to flash the hacked firmware, !disconnect your device! and
enter 'yes'.
- The hacked firmware now is in the 'fwimage.bin'-file. Please revise the
patched areas around PATCH_AT and EMPTY_AT: a mistake here could in theory
brick your device.
- If you're sure it'll work, you can try the hackfw.sh script for real.
- Rejoice if you see the 'It Works!' image :)
- If you see a garbled mess or if the image is offset, your OFFX, OFFY or
CONF_BPP-settings are wrong. Go to the setpic-dir and run
./setpic /dev/sdX -test test.png
and fiddle with the keys. As soon as your image is correct, you can copy
the displayed settings to the spec-file.
- Zip up the m_yourmachine directory and mail it to
me <picframe@spritesmods.com>, if you like.
|

 分享一个SA6400 的SN981 人气#黑白群晖
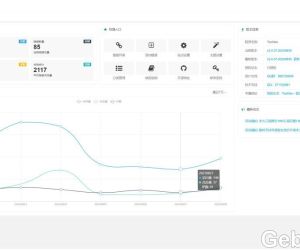 TwoNav 开源|网址导航|云书签程序4864 人气#综合讨论
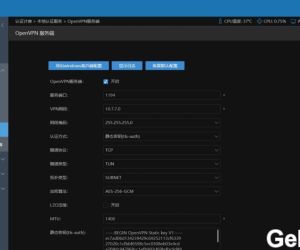 爱快软路由快速OpenVpn设置-不用建账号149 人气#黑白群晖
 转码新宠,Intel DG1 SA6400驱动+PVE直通内7347 人气#黑白群晖


 提升卡
提升卡 置顶卡
置顶卡 沉默卡
沉默卡 喧嚣卡
喧嚣卡 变色卡
变色卡